Friday, December 11, 2009

DD-WRT schedule reboot not working

I use my Airlink 101 AR670W router as an access point with DD-WRT v24-sp2 build 13069.Because there are two many wireless networks in my neighborhood, I'd like it to scan and pick a least crowded channel for my SSID every day. So I enabled schedule reboot in Administration->Keep alive at a fixed time every day. But it didn't work since the uptime kept accumulating and the syslog didn't show signs of reboot.

I noticed on its router status page current time was always blank.I had enabled its built-in NTP client in page Setup->Basic setup->Time settings after entering the correct time zone and the IP address of the NTP server and thought this would update the system time correctly. But it didn't. I then logged into the router by SSH/telnet with the same admin user of the web interface and did the following checks and/or fixes.
  1. cat /etc/cron.d/check_schedules
    30 19 * * * root /sbin/reboot
  2. ps | grep cron
     1007 root       976 S    cron

  3. Typed the date command. To my surprise, it shows a date in year 1970. I then manually set the date and time by date 121122142009 (date MMDDhhmmYYYY). Although it shows the resulting time as UTC, it's actually the right time for my time zone and appeared as current time on the router status page 
  4. Ping the ntp server IP. I got no response. I found I had forgot to set the default gateway, so I set the right gateway IP at page Setup->Basic setup->Network setup and ping the ntp server again. Now there comes reponse.
One day after I've done the above, I found the schedule reboot started working and uptime was counting correctly. As a result, my wireless channel was updated to offer better signal quality.

Sunday, December 6, 2009

Uploading windows printer drivers to Samba

  1. Click Start->Run.  In the Open field, type \\%sambaserver% where %sambaserver% is the actual Samba server name.  i.e. \\myserver Click OK
  2. Find and double click on Printers and Faxes.
  3. Right-click on the printer name that's relevant and select the Properties entry. This opens a dialog box that indicates that The printer driver is not installed on this computer. Some printer properties will not be accessible unless you install the printer driver. Do you want to install the driver now?  It is IMPORTANT at this point you ANSWER NO.
  4. The printer properties panel for the printer on the server is displayed. Click the Advanced tab. Note that the box labeled Driver is empty. Click the New Driver button that is next to the Driver box. This launches the Add Printer Wizard.
  5. The Add Printer Driver Wizard on Pier panel is now presented. Click Next to continue. Select the printer manufacturer from the left panel.  In the right panel, select the printer. Click Next, and then Finish to commence driver upload. A progress bar appears and instructs you as each file is being uploaded and that it is being directed at the network server \\myserver\print$\W32X86. If the driver upload fails, verify that the W32X86 folder exists.  If it does not exist, create it and then try adding the printer drivers again.
I found the method on this web link.

Sunday, November 22, 2009

Improve throughput with Intel 5100 in wireless N mode

When I test its throughput (from a wired computer) in wireless N-only mode with iperf in vista, the maximum throughput I was able to get is around 25Mbits/s although it shows 270-300Mbps data rate by windows. The router is a Airlink AR670W with stock firmware 1.01 and 40MHz channel width/Auto(DFS) channel. It's not faster than the throughput of Wireless G mode.

After I update the firmware of AR670W to DD-WRT build 13069, I found the signal quality of the Intel 5100 client is only around 23% at full Tx power (251mW) from the wireless status page. And it can only improves the throughput to ~35Mbits/s with iperf -w 64k -c intel-5100. Then I started to adjust the following things:
  1. Orientation of the two antennas of AR670W: On one position I found the signal quality of Intel 5100 was improved to 34%. 
  2. Manually set the channel number: After doing a site survey, I found the least crowded channel was not the one being picked up by DD-WRT. So I changed the channel number and the signal quality of Intel 5100 was improved to 40%

    Then I tested the throughput again, and no surprise it's now ~80Mbits/s. Even if I further increase the TCP windows size of iperf from 64k to 10M or reduce the Tx power to half (126mW), the throughput remains at ~80Mbits/s (wired to wireless). Later I had to enable the N-only wireless mode on a D-link DIR-655 router to maximize the throughput of another Intel 5100.

Friday, November 20, 2009

Samsung SGH-A887 (solstice)

  1. QUALCOM USB mode of Samsung 3G phones:


    • Dial *#782872# and confirm after 2 seconds to activate the mode
    • Connect phone to PC USB port with USB cable
    • After the drivers are installed, the following two were found under Ports
      • PHD HS-USB diagnostics 9002
      • PHD HS-USB NMEA 9002
    • PHD HS-USB Modem 9002 was installed under Modems
    • Two USB Composite Devices were installed under Universal Serial Bus Controllers
    • To exit QUALCOM mode, dial *#726872# and confirm after 2 seconds


  2. Firmware downloader mode:


    • Power off the phone
    • Remove any memory card you may have and then remove the SIM card
    • Hold down the 'Volume down' key (The bottom rocker button on the left side of your phone) and the camera button and press the power on button. 
    • A887 should start up into a screen with these on the top: DEMSBL BOOT loader for MSM6290 More than Downloader V5.43
    • Get MultiLoader V5.56 here to download the firmware for MSM6290


Sunday, November 8, 2009

Asterisk (PBX) and PAP2T

  1. hasexten=yes|no
    If the context for a peer sets hasexten=yes, Asterisk creates a hint for the user in the default context as shown below for a SIP peer 6000.
    CLI> dialplan show default
    [ Context 'default' created by 'pbx_config' ]
    '6000' => hint: SIP/6000 [pbx_config]
    1. Dial(${HINT}) [pbx_config]

    Therefore I can use Goto(default,6000,1) to ring it
  2. [general] user in users.conf
    It's set the default contexts for all other users. They can be overridden though. The following are in my [general] user (all my users are using SIP):
    fullname = My Name
    ;
    ; Starting point of allocation of extensions
    ;
    userbase = 6000
    ;
    ; Create SIP Peer
    ;
    hassip = yes
    ;
    ; Create IAX friend
    ;
    hasiax = no
    registeriax = no
    ;
    ; Create manager entry
    ;
    hasmanager = no
    callwaiting = yes
    threewaycalling = yes
    callwaitingcallerid = yes
    transfer = yes
    canpark = yes
    cancallforward = yes
    callreturn = yes
    call-limit = 100
    qualify = yes
    disallow = all
    allow = ulaw,alaw
    type = friend
  3. Asterisk directed call pickup
    I have two extensions: 6000 and 8888. Typically when there's a incoming call, only extension 6000 rings. I can pick up the call from the other extension though by pressing the # key from extension 8888. Therefore I have the following in features.conf
    [general]
    pickupexten = #

    and the following in extensions.conf:
    [globals]
    voipbuster = SIP/voipbuster

    [CallingRule_pickup]
    exten = _#,1,Pickup(6000@default)
    exten = _#,n,Hangup()

    [DLPN_8888]
    include = CallingRule_pickup
    include = CallingRule_VBOut
    include = default

    [CallingRule_VBOut]
    exten => _001.,1,Dial(Local/${EXTEN:2}@gv-outbound/n)
    exten => _00[2-9]X.,1,Macro(trunkdial-failover-0.3,${voipbuster}/${EXTEN:0},,voipbuster,)

    I had to add the following to the Dial Plan of the line that will pickup the call in my PAP2T to pass # key directly to Asterisk: #S0
  4. Blind transfer
    I use the * key for Blind transfer. Therefore I have the following in features.conf
    [featuremap]
    blindxfer = *
    and the following in extensions.conf:
    [globals]
    DIALOPTIONS = tT

    [DLPN_6000]
    include = CallingRule_VBOut
    include = default
    include = parkedcalls
    include = conferences
    include = ringgroups
    include = voicemenus
    include = queues
    include = voicemailgroups
    include = directory
    include = pagegroups
    include = page_an_extension
    exten = _*,1,Transfer(8888)

    I had to add the following to the Dial Plan of the line that will initiate the transfer in my PAP2T to pass * key directly to Asterisk: *S0
  5. Connecting PAP2T to the telephone lines 1&2 in my house (T568A type socket): I cut one standard 2-wire RJ11 telephone cable assembly in half and connected them to Blue and Orange lines of the T568A. That will enable me to connect a phone onto the wall outlet at any room to my PAP2T.

Friday, October 30, 2009

Knowledgetree document management software

  • WebDAV:
    1. Don't rename the root folder. Otherwise access from WebDAV will be broken and the error says the folder is no longer available.
    2. No matter what name you give to the root folder, after turning on WebDAV Debug, the log shows KTWEBDAV [info] Root Folder is : Root Folder
  • Indexer Problem A: All documents are sitting in the quene to be indexed but none were indexed
    1. Change in config.ini or at URL /admin.php?kt_path_info=config/generalconfigpage to set loglevel=DEBUG
    2. Modify the file search2/bin/cronIndexer.php and change the line
      KTUtil::call_page(KT_DIR.'search2/indexing/bin/cronIndexer.php');
      to
      KTUtil::call_page('search2/indexing/bin/cronIndexer.php');
    3. Enter the folder bin/luceneserver and edit KnowledgeTreeIndexer.properties to have the following contents:

      server.port=8875
      server.paranoid=true
      server.accept=127.0.0.1
      indexer.directory=../../var/indexes
    4. Access forbidden error found in the log file at var/log after the following line
    5. Modify the .htaccess file to allow access
    6. Indexer working


  •  Indexer problem B: File not indexed since it had the wrong extension
  1. Go to database dms table document_content_version
  2. Search for the known document_id that had indexing problem and write down its mime_id
  3. Search for this mime_id in the table mime_types: e.g. 167 has filetypes pptx but the file should have file type ppt (mime_id: 74)
  4. Update to the correct mime_id of the document in the table document_content_version
  • LDAP accounts import with uid set as default username
    Edit the file
    plugins/ktstandard/ldap/ldapbaseauthenticationprovider.inc.php
    locate the following line in functions _do_editUserFromSource() and _do_massCreateUsers()
    $sUserName = $aResults[$this->aAttributes[1]]
    change it to
    $sUserName = $aResults[$this->aAttributes[7]]
    Note the definition of the array aAttributes is
    var $aAttributes = array ('cn', 'samaccountname', 'givenname', 'sn', 'mail', 'mobile', 'userprincipalname', 'uid');

    In order to correct the behavior that Mass Import Search for users returns unwanted objectclasses, locate the following line in function searchUsers:
    $sFilter = !empty($sSearch) ? sprintf('(&(%s)(%s))', $sObjectClasses, $sSearchAttributes) : null;
    and change it to
    $sFilter = !empty($sSearch) ? sprintf('(&(%s)(%s))', $sObjectClasses, $sSearchAttributes) : '(objectClass=posixAccount)';
    Recently I found a need to customize the LDAP search filter, therefore now it looks like
    $sFilter = !empty($sSearch) ? sprintf('(&(%s)(%s)(!(employeeNumber=0)))', $sObjectClasses, $sSearchAttributes) : '(&(objectClass=posixAccount)(!(employeeNumber=0)))';
  • Increase Session Timeout:


    1. In Mandriva Linux, PHP Session Timeout is affected by the file /usr/lib/php/maxlifetime. Default is 1440 seconds (24 minutes). Updating the file /etc/php.d/47_session.ini to include the following: session.gc_maxlifetime = 30000 will increase the timeout to 500 minutes.
    2. The config_settings table is queryed and populated into the global variable $default in file lib/config/config.inc.php within function populateDefault()


Using the find command

  • In one case, I need to rename a bunch of files from upper case to title case (only the first letter of the file name is capitalized). For exmaple, AAA.C --> Aaa.c and ABC.C --> Abc.c

    This can be done with find and perl in the following manner:
    find . -maxdepth 1 -type f -execdir perl -e 'rename substr($_,2),ucfirst(lc(substr($_,2))) for @ARGV' '{}' \;

    Useful reference: How to rename to lowercase every file in a directory and its subdirectories?
  • How to check whether the contents of a directory is newer than 10-day old: I used the following command
    find /home/user -maxdepth 2 -mtime -10 -print -quit
    It will search the path /home/user and one level below that for anything that's newer than 10-day old and quit after a match is found.

Functions of MortScript

  1. Function to rename a directory/folder: just use Rename(oldDirName,newDirName,True) Although in the 4.1 manual it says Rename is for a file, it works for directories too.
  2. Function to enlarge the font size of Choice/ChoiceDefault: I use SetChoiceEntryFormat(45,36) when there are less than or equal to three choices to display on my 480x272 screen.

Sanyo NVM-4050 GPS

  1. Keep PNAShell.exe running for the Menu/Power button to work
  2. Kill MainPanel.exe before running Media player
  3. It can be wrapped in a MortScript to launch media player by the following command
    CallScript("MplayerLauncher.mscr", "\myflashdisk\programs\mediaplayer", "Player.exe")
    
    The content of the MplayerLauncher.mscr is shown below:
    ErrorLevel("warn")
    
    CWD = SystemPath("ScriptPath")
    
    appFolder = argv[1]
    appEXE = argv[2]
    
    If(FileExists(appFolder\appEXE))
    
    If(ProcExists("MainPanel.exe"))
    MainPanelRunning = "true"
    Kill("MainPanel.exe")
    EndIf
    
    RunWait(appFolder\appEXE)
    
    If(MainPanelRunning eq "true")
    Run("\ShellDisk\Shell\Communication\MainPanel.exe")
    Waitfor("MainPanel", 3)
    EndIf
    
    Else
    BigMessage(appFolder\appEXE&" was not found. Install the application to that path and try again.","Application not found")
    EndIf
    
  4. Native support by GAPI can be achieved by selecting the Acer P615 device for both 16 and 32 bit (thanks to Robert) . Otherwise use emulator (GAPI to GDI wrapper).
  5. When a corrupted folder is detected in myflashdisk by the windows CE, open error checking from XP to check the flash drive
  6. CPU ARM920T S3C2443 (thanks to Checko), Windows CE 5.0 core, 480x272 screen
  7. Bootloader's menu (unbrick a bricked GPS)
    • Download the driver package from here
    • Hold down the Menu button while powering it on or hard reset
    • Connect the unit to PC via USB
    • Install the driver secbulk.inf for SEC SOC USB Bulk IO Test Board Secbulk from the USB driver folder 
    • Run the USB/Serial Downloader DNW5.0e.exe 
    • Make a test of USB connection by clicking the” USB port/Status”. If all is ok go to next step
    • Click “USB port/Transmit” and select the file “MioP550 - Osc260A R05_P09.nb0” repair the WinCE (not working yet)
    • Press the reset button to reboot.

Nintendo Wii

  1. My Wii was purchased as a bundle from Samsclub.com and has a serial number of LU 3086XXXXX. Its DVD drive chipset is GC2R-D2B.
  2. To open up the console, a special tool -- Tri-wing Screwdriver is needed. I got it from Play-asia.com for $3.99+$1.30 shipping (Air Economy Bubble). I also have a small philipps screwdriver for other screws.
  3. The Wii modchip I have is WiiKit, which is based on WiiKey with the extra feature of an optional wires installation. I got it from Divineo.com for $9.99+$8.49 shipping (Registered Air Mail).
  4. I followed this Guide to disassemble the Nintendo Wii (Video and Pictures).
  5. Since the WiiKit comes with the installation wires, all I need is a soldering iron with a sharp tip and solder. The soldering job is straightford according to this picutre.
  6. Download the latest Update and Config disc files from the official website of Wiikey and generate the ISO images according to the Readme.txt file after extracting them (using the fixsize.cmd and filechop.exe).
  7. I burned the image to a TEON 8X DVD-R at 4/8X speed and TDK 16X DVD+R at 6/16X speed with either a Toshiba or Optiarc burner.
  8. Insert the burned Update disc into Wii and it updated the firmware of the Wiikey to the latest version (two cycles: one test and one actual update). Insert the burned Config disc after rebooting, the Wiikey Setup Menu showed up. It confirmed the installation of the Wiikit is good. I don't have a gamecube controller, so I have to use the reset button on the console to access the Setup Menu as suggested in the Readme.txt file.
  9. Guide -- Wii Disc Backup
  10. WII ModChip Compatibility List
  11. Wii SoftMod guide for System Firmware 4.1 and below: No need to disassemble your wii or use a soldering iron. All you need is a SD card.
  12. How to add/import a WBF file on a PC hard drive into a WBFS partition: I was able to do it with the wbfs.exe (wbfs windows port build 'delta'. Mod v1.7 by flfl.) tool from the package wbfs中文管理器2.91. The syntax is wbfs n a filename.wbf (assuming n: is the drive letter for the WBFS partition and a for add.). After it's done, the games installed on the WBFS partition can be listed by wbfs n l (l for list). You may need the file wwbfs.exe in the same folder as wbfs.exe and the wbf file to make it work. 
  13. How to add/import a WBFS file on a PC hard drive into a WBFS partition: An excellent GUI tool called Wii Backup Manager. I tried version 0.3.6 beta1.
  14. Unofficial USB to Ethernet adaptes for Wii

Samsung SPH-M500 cell phone

  • Discussion threads about Sprint SERO Plan: Fatwallet, Slickdeals

  • How to change your ESN number on a CDMA phone (haven't tried)
  • Download mode: When the phone is powered off, hold down key 9 and push PWR/END key at the same time to power it on. Then it will enter a Download Mode by showing Mode: Emergency and Port: USB.

  • Samsung PST dll file: discussion thread on Mobile-files

  • M500 service manual: discussion thread on Mobile-files

  • How to unlock the 6-digit SPC/MSL code of M500/M330:
    1. Install the Samsung MCCI Modem driver (Ver. 4.38.5 can be downloaded from Samsung) on your PC
    2. Plug in the USB data cable into the phone. You should see two new devices on your Windows Device Manager: Samsung Mobile Modem and Samsung USB Composite Device. Right click on Samsung Mobile Modem and click on Properties -> Advanced -> Advanced Port Settings. Set the COM port number to COM1 or COM2.
    3. Register an user on Mobile-files to download and run the Kyocera Slider Tool SE47. Select the COM port number you set in Step 2. and then click on the Connect button. The SPC code is displayed upon connection. Click the Connect button again and the SPC code will be set to all zeros: 000000.
    4. The SE47 tool also has a function for writing ESN into the phone (haven't tried).

  • How to activate SPH-M500/M330 on Verizon network or its MVNO (such as Page Plus cellular).
    1. Set the 6-digit SPC/MSL of M500 to all zeros with the method described above
    2. Download a Verizon PRL such as 52775.PRL
    3. Call your service provider and write down your Phone Number (MDN) and MSID (MIN)
    4. Enter "##000000#"from keypad of M500 to show the SVC menu and click Edit. Enter the Phone number and MSID obtained above.
    5. Open CDMA workshop 2.7 (which can be found on Mobile-files):
      • On the Main tab, select the correct COM port and click on the Connect button (the rightmost one)
      • After the connection is successful, click on the Security tab. In the left-bottom box named Password (16 digits), select Samsung (default) then click the Send button below. A message box should pop up saying the phone is unblocked.
      • Click on the Other tab. In the right-top box named PRL, click on the Read button to backup the sprint PRL of m500 with Universal method from NAM1. After the original PRL is backed up, click on the Write button next to it. Choose the 51600.PRL file and click Open, then click Ok.
      • After the Verizon PRL is written, go back to the Main tab and click the Mode button (second from left to right on the bottom) then click Reset. M500 will reboot.
    6. Program the M500 OTA by dialing *22890
    7. Update the PRL by dialing *228 and choose Option 2
    8. Make an outgoing call to complete the activation on Pageplus
    9. Reference: Verizon Handset Manual Activation on howard forums

Monday, September 21, 2009

DDR2 DRAM frequency with AMD K8 architecture

I found the relevant information from a review in NewEgg for Athlon 64 X2 5050e. The AMD K8 architecture moved the memory controller from the MB to CPU die and it runs at full CPU clock frequency. But DDR2 RAM cannot run at the same clock frequency as the CPU core, so there is a divider that is applied to the CPU clock speed to come up with the final DRAM frequency.

The DDR2 divider for AM2 CPUs is an integer based on CPU multiplier and is calculated like this: CPU multiplier x 0.5 x RAM ratio (this is 1 for DDR2-800, 1.2 for DDR2-667, 1.5 for DDR2-533 and 2 for DDR2-400) then rounded upwards to the nearest integer .

For e.g.: The CPU multiplier for 5050e is 13 and its CPU clock speed is 2600MHz (13x200MHz). The DDR2 divider is then 7 (rounded up from 13 x 0.5 x 1.0 = 6.50). DDR2-800 memory will be running at the CPU clock speed divided by 7, which is 371.4MHz = 2600/7 and lower than than the rated speed 400MHz of DDR2-800. To have it running at 400MHz, we need to overclock a little: the necessary CPU clock would be 400 * 7 = 2800MHz. Therefore the FSB should be overclocked by 7.7% to 2800/13 (CPU multiplier) = 215.4 from the default speed 200MHz.

I then went to my BIOS and set the FSB to 216 (215 is not an option for my MB) and save it. Afterwards the cpuz shows my FSB becomes 216.7MHz and HT link is 1083.4MHz. When the CPU is not idle (then the CPU multiplier is 13), the CPU clock speed becomes 2816.9MHz and the DRAM frequency is 402.4MHz (2816.9/7).

If the CPU has an even multiplier (e.g. 14 for a 2800MHz speed), no overclock would be needed to run DDR2-800 at its rated frequency of 400MHz.

Saturday, September 19, 2009

Read benchmark of my hard drives and memory

Hard drives and memory read benchmark:
  1. WDC WD800JB: BuffSize=8192kB, udma5
    hdparm buffered disk reads: 154 MB in 3.01 seconds = 51.09 MB/sec
  2. WDC WD7500AACS: BuffSize=16384kB, udma6
    hdparm buffered disk reads: 248 MB in 3.00 seconds = 82.58 MB/sec
  3. WDC WD1600JB: BuffSize=8192kB, udma5
    HD tune maximum read rate: 56 MB/sec
  4. WDC WD3200AAKS: BuffSize=16384kB, udma6
    HD tune maximum read rate: 101 MB/sec
  5. Seagate ST340014A: BuffSize=2048kB, udma5
    HD tune maximum read rate: 56 MB/sec
  6. Sempron 3100+ and DDR333:
    Stream C: 1200-1300MB/s (single channel)
  7. Celeron E1400 and DDR2-800:
    Stream C: 2400-2900MB/s (single channel)
  8. Athlon X2 5050e and DDR2-800:
    Stream C: 2300-2400MB/s (single channel)
  9. Core 2 Solo SU3500 and DDR2-800:
    Stream C: 2600-3000MB/s (single channel)

Saturday, August 15, 2009

How to reinstall DirectX 9.0

One day my media player stopped playing back video and GraphEdit kept complaining DirectShow Core Components Failed To Initialize. I tried reinstall/updrade the Windows Media Player 11 but that didn't help.

Later I found out that I had to reinstall DirectX to fix it. I tried downloading the DirectX 9.0c Redistributable for Software Developers and ran dxsetup.exe but it completed in a second since it thought my windows already had updated DirectX version. I also tried deleting some registry entries about DirectX, but that didn't help either. Therefore I went to folder where the installation files were and extracted the file dxnt.cab, which gave me a subfolder dxnt. Next I created a system resotre point in case I would need it later.

I then browsed into the newly created dxnt folder and selected all the inf files (sort by type: setup information) in it then right click and click Install on the context menu. It then copied all the driver files from the dxnt folder to %systemroot%\system32 folder and imported necessary changes to the registry. Afterwards, my media player worked again and GraphEdit didn't throw out any more error. However, MediaPortal was still complaining about "VMR9 handler outdated". It seems the above method didn't replace the files being used such as ddraw.dll. Therefore, I did a reinstall of XP service pack 3 to fix it. And MediaPortal was running smoothly afterwards.

Friday, August 7, 2009

VOIP trunks in Asterisk (Gizmo5, GTalk, VoiceStick and Stanaphone)

Add VOIP trunks by AsteriskNow GUI or edit users.conf manually. Type asterisk -r -vvv for more verbose debug information.
  1. Gizmo5/Google Voice:
    [1sipnumber]
    context = DID_1sipnumber
    host = proxy01.sipphone.com
    trunkname = Gizmo5 ; GUI metadata
    username = 1sipnumber
    secret = password
    hasiax = no
    registeriax = no
    hassip = yes
    registersip = yes
    trunkstyle = voip
    hasexten = no
    canreinvite = yes
    disallow = all
    qualify = yes
    allow = ulaw,alaw
    insecure = port,invite

    The context can be found in the file extensions.conf as below
    [DID_1sipnumber]
    exten = s,1,GotoIf($[${LEN(${CALLERID(num)})} > 10]?1-setcid,1)
    exten = s,n,Goto(1-dial,1)
    exten = 1-setcid,1,Set(CALLERID(num)=${CALLERID(num):2})
    exten = 1-setcid,n,Goto(1-dial,1)
    exten = 1-dial,1,Goto(default,6000,1)
    exten = 1-dial,n,Hangup()

    The above context strips the leading "+1" from the incoming caller ID the provider(sipphone) sends to Asterisk and rings extension 6000 for the incoming calls.

    Ref: How to change incoming CallerID

  2. VoiceStick (avoid it if possible): it uses outbound proxy 72.5.80.116:5060 or 72.5.80.117:80. But I couldn't make it work with my Asterisk or Linksys PAP2T under their Next2Nothing or Asterisk Two plan.
    Add the following to /etc/hosts
    72.5.80.116 i2telecom.com
    and the trunk in users.conf
    [1phonenumber]
    context=DID_1phonenumber
    host=i2telecom.com
    trunkname=i2telecom.com
    username=1phonenumber
    secret=password
    hasiax=no
    registeriax=no
    hassip=yes
    registersip=yes
    trunkstyle=voip
    hasexten=no
    disallow=all
    allow=all
    qualify = yes
    canreinvite = no
    insecure = port,invite

  3. GTalk:
    I have the following in the file extensions.conf to set the correct incoming caller ID for the google account that's calling in. The name of the caller will be shown as Gtalk/google_account_name
    [gtalk-in]
    exten = _.,1,NoOp(${CHANNEL})
    exten = _.,2,Set(CALLERID(name)=${CUT(CHANNEL,,1)})
    exten = _.,3,Set(CALLERID(num)=${CUT(CHANNEL,,2)})
    exten = _.,4,Goto(default,6000,1)
    exten = _.,5,Hangup()

  4. Stanaphone: It's important to have the right insecure setting. Otherwise it will try Digest-MD5 authentication for incoming calls and fail instantly.
    [username]
    context = DID_username
    host = sip.stanaphone.com
    trunkname = Stanaphone ; GUI metadata
    username = username
    secret = password
    hasiax = no
    registeriax = no
    hassip = yes
    registersip = yes
    trunkstyle = voip
    hasexten = no
    disallow = all
    allow = all
    qualify = yes
    canreinvite = yes
    insecure = port,invite

Saturday, August 1, 2009

Wake up from S3 by USB in XP

I did a search in the internet and came across this article first. Then I found the MS KB article titled Description of how to enable the S3 system power state for standby when USB devices are armed for wake. I had to create a new key named "usb" under HKEY_LOCAL_MACHINE\SYSTEM\CurrentControlSet\Services and then add a new DWORD value as shown below:
HKEY_LOCAL_MACHINE\SYSTEM\CurrentControlSet\Services\usb
"USBBIOSx"=DWORD:00000000

I needed to reboot after I made the change to the registry. Afterwards the power management tabs appeared for both the HID keyboard and mouse. I was able to enable either the keyboard or mouse or both to wake up the system from S3 standby.

Friday, July 31, 2009

XP migration from intel to AMD platfrom results in BSOD error 7E

I recently upgraded my old PC dell PE400SC which had an Intel Pentium 4 2.4C. The new platform is NForce 720a + AMD 5050e. After I migrated the SATA hard drive from the 400SC to the new system, it boots into safe mode successfully without seeing the infamous BSOD error 7B. It seems to me the SATA controllers on both motherboards use the same driver in XP.

However, when I tried to boot the XP into normal mode, it always died with a BSOD error 7E. After I did a search on the internet, I found this article that suggests the error is caused by XP trying to load a driver intelppm.sys. Therefore I deleted the file intelppm.sys from %systemroot%\system32\drivers in safe mode and reboot the system. Guess what? It boots successfully and I only needed to install the drivers for the new hardware.

My PAP2T can't log into Voipbuster any more

I found the last registration date shown on my PAP2T was on 7/28/2009 and that's three days ago. I was using sip.voipbuster.com as the proxy and I can still ping it. But with Wireshark, I found it's not responding any packets back to the SIP Register requests from my PAP2T.

However, the voipbuster software can still log into my account and it's trying to register on another proxy: connectionserver2.voipbuster.com. Although I can't ping it, my PAP2T can now successfully register on it after I change the proxy. The server connectionserver.voipbuster.com also works.

Saturday, July 4, 2009

Enable UPnP support in Mandriva with Shorewall

I found that in order to enable UPnP support in Shorewall, I need to have linux-igd installed. However, I couldn't find a ready-to-install linux-igd RPM for Mandriva. Therefore, I had to perform the following
  • Downloaded the linux-igd-1.0-7 RPM for Fedora 10 from here
  • Install libupnp3-1.6.6-1mdv2009.0 by running urpmi libupnp3
  • Install the linux-igd in Mandriva by running rpm -Uvh --nodeps linux-igd-1.0-7.fc10.i386.rpm.rpm
  • Update the file  /etc/sysconfig/upnpd  with the right interfaces
  • Make the following changes in /etc/init.d/upnpd to make it compatible with MSN/Windows live messenger. (I used the tag <pre name="code" class="cpp"></pre> to embed code here)
9a10,16
> #
> ### BEGIN INIT INFO
> # Provides: upnpd
> # Default-Start: 3 4 5
> # Short-Description: Internet Gateway Device
> # Description: Emulates Microsoft's Internet Connection Service (ICS)
> ### END INIT INFO
15c22
< allow_multicast="no"> ALLOW_MULTICAST=yes
36c43
<           [ "$ALLOW_MULTICAST" != "no" ] && route add -net 239.0.0.0 netmask 255.0.0.0 $INTIFACE --- >           [ "$ALLOW_MULTICAST" != "no" ] && route add -net 224.0.0.0 netmask 240.0.0.0 $INTIFACE
50c57
<       [ "$ALLOW_MULTICAST" != "no" ] && route del -net 239.0.0.0 netmask 255.0.0.0 $INTIFACE --- >       [ "$ALLOW_MULTICAST" != "no" ] && route del -net 224.0.0.0 netmask 240.0.0.0 $INTIFACE
63c70,71
<>       stop
>       start

and the following changes to /etc/upnpd.conf as described in ShoreWall and UPnP.
51c51
< forward_chain_name =" FORWARD"> forward_chain_name = forwardUPnP
57c57
< prerouting_chain_name =" PREROUTING"> prerouting_chain_name = UPnP
63c63
< upstream_bitrate =" 512000"> upstream_bitrate = 384000
69c69
< downstream_bitrate =" 512000"> downstream_bitrate = 1000000

I also made the following changes to the ShoreWall configuration files (my loc->fw policy is already ACCEPT)
grep -i pnp /etc/shorewall/*    
/etc/shorewall/interfaces:net     eth1            detect dhcp,tcpflags,nosmurfs,routefilter,upnp
/etc/shorewall/rules:forwardUPnP     net        loc

Finally I started the upnpd daemon by servcie upnpd start and chkconfig --add upnpd then service shorewall restart.

After a windows workstation initiated a video call in MSN messenger, the following ports were opened:
iptables -t nat -L UPnP
Chain UPnP (1 references)
target     prot opt source               destination         
DNAT       udp  --  anywhere             anywhere            udp dpt:36481 to:192.168.0.113:16727 
DNAT       tcp  --  anywhere             anywhere            tcp dpt:32995 to:192.168.0.113:9049

The version of relevant packages:
Kernel: 2.6.29.1-server-4mnb
Iptables: 1.4.3.1-3mnb2
Shorewall: 4.2.10-1mdv2010.0

Friday, July 3, 2009

Use Opti-UPS CS730B with Linux

It has a USB port, however it can not be autodetected by nut-2.4.1 of my Mandriva linux since the port /dev/ttyUSB0 was not created when it's plugged in. The kernel detected a powercom USB to serial converter but the usbhid driver is binding to it as shown in /proc/bus/usb/devices

T: Bus=02 Lev=01 Prnt=01 Port=03 Cnt=01 Dev#= 7 Spd=1.5 MxCh= 0
D: Ver= 1.00 Cls=00(>ifc ) Sub=00 Prot=00 MxPS= 8 #Cfgs= 1
P: Vendor=0d9f ProdID=0002 Rev= 0.00
S: Manufacturer=POWERCOM CO., LTD.
S: Product=USB to Serial
C:* #Ifs= 1 Cfg#= 1 Atr=80 MxPwr=100mA
I:* If#= 0 Alt= 0 #EPs= 2 Cls=03(HID ) Sub=00 Prot=00 Driver=usbhid
E: Ad=81(I) Atr=03(Int.) MxPS= 8 Ivl=10ms
E: Ad=02(O) Atr=03(Int.) MxPS= 8 Ivl=10ms

Apparently it's not of the USB/HID UPS type since it can't be matched to any known device by usbhid-ups. I searched the internet and found a proposed fix: In order to recognize it correctly, I had to rmmod usbhid cypress_m8 and modprobe cypress_m8. Afterwards the following is shown in


T:  Bus=01 Lev=01 Prnt=01 Port=00 Cnt=01 Dev#=  4 Spd=1.5 MxCh= 0
D:  Ver= 1.00 Cls=00(>ifc ) Sub=00 Prot=00 MxPS= 8 #Cfgs=  1
P:  Vendor=0d9f ProdID=0002 Rev= 0.00
S:  Manufacturer=POWERCOM CO., LTD.
S:  Product=USB to Serial
C:* #Ifs= 1 Cfg#= 1 Atr=80 MxPwr=100mA
I:* If#= 0 Alt= 0 #EPs= 2 Cls=03(HID  ) Sub=00 Prot=00 Driver=cypress
E:  Ad=81(I) Atr=03(Int.) MxPS=   8 Ivl=10ms
E:  Ad=02(O) Atr=03(Int.) MxPS=   8 Ivl=10ms


and the following from dmesg:

cypress 2-4:1.0: HID->COM RS232 Adapter converter detected
usb 2-4: HID->COM RS232 Adapter converter now attached to ttyUSB0


Subsequent modprobe usbhid doesn't remove the port ttyUSB0. Now I can download a copy of the managing software from the manufacture OPTI-UPS: OPTI SAFE Xtreme+ V1.0 for Linux (dated 2009-05-21), which appears to me a tar archive. Its License Key (85OPT4-584499) & User Manual can be downloaded from the same link (RAR archive). After I install it, I have the following lines in /usr/ups/ups.cfg
UpsModel=--CLEVER Series 110V/60Hz--
UpsDevice=/dev/ttyUSB0:1200,n,8,1
UpsCable=0
PortTCP=8081

Then I can start the upsman and

  • Connect to its web server through http://localhost:8081/ and monitor the status of the CS730B. After disconnect, I can also configure it through the web.
  • Configure the UPS by running the command service upsman conf

Wednesday, May 27, 2009

PAM/LDAP authentication for webmin

In order to make it work, I have the following lines in /etc/webmin/miniserv.conf, which means it allows all unix users of admin group to login to webmin with their PAM password and act as root user of webmin or all unix users of user group to login with their PAM password and act as dnsmasq user of webmin.
unixauth=@admin=root @user=dnsmasq
pam=webmin


The following line in /etc/webmin/miniserv.users defines users of webmin (two users defined with name root and dnsmasq)
root:x:0::::::::
dnsmasq:x:0:::::::0:


The following lines in /etc/pam.d/webmin provides LDAP authentication for PAM password
auth sufficient pam_ldap.so
auth include system-auth

account sufficient pam_ldap.so
account required pam_nologin.so
account include system-auth

password required pam_ldap.so
password include system-auth

session sufficient pam_ldap.so
session include system-auth

Saturday, May 16, 2009

Reduce the number of ports opened by Asterisk

When I type the command netstat -lnp | grep asterisk as root, I found the following ports were opened by Asterisk.
tcp 0 0 192.168.0.1:5038 0.0.0.0:* LISTEN 2850/asterisk
tcp 0 0 0.0.0.0:2000 0.0.0.0:* LISTEN 2850/asterisk
tcp 0 0 192.168.0.1:8088 0.0.0.0:* LISTEN 2850/asterisk
udp 0 0 0.0.0.0:4569 0.0.0.0:* 2850/asterisk
udp 0 0 0.0.0.0:2727 0.0.0.0:* 2850/asterisk
udp 0 0 0.0.0.0:4520 0.0.0.0:* 2850/asterisk
udp 0 0 0.0.0.0:5060 0.0.0.0:* 2850/asterisk
unix 2 [ ACC ] STREAM LISTENING 762262 2850/asterisk /var/run/asterisk/asterisk.ctl


I know that the following ports are typically used by my Asterisk
tcp 5038 manager
tcp 8088 AsteriskNOW
udp 4569 iax2
udp 5060 sip
udp 18000-20000 rtp (rtp.conf)

Therefore I put the following lines into /etc/asterisk/modules.conf
; Don't load skinny (tcp port 2000)
noload => chan_skinny.so
; Don't load MGCP (udp port 2727)
noload => chan_mgcp.so
; Don't load dundi (udp port 4520)
noload => pbx_dundi.so


Upon restarting Asterisk, the command netstat -lnp | grep asterisk only shows the following:
tcp 0 0 192.168.0.1:5038 0.0.0.0:* LISTEN 3168/asterisk
tcp 0 0 192.168.0.1:8088 0.0.0.0:* LISTEN 3168/asterisk
udp 0 0 0.0.0.0:4569 0.0.0.0:* 3168/asterisk
udp 0 0 0.0.0.0:5060 0.0.0.0:* 3168/asterisk
unix 2 [ ACC ] STREAM LISTENING 764510 3168/asterisk /var/run/asterisk/asterisk.ctl

Monday, April 27, 2009

Using WPA2 with Intel Wireless LAN 2100

My thinkpad X31 has a Intel(R) PRO/Wireless LAN 2100 3B Mini PCI Adapter and according to this product brief, it is Wi-Fi CERTIFIED for WPA although it's a IEEE 802.11b card.

I upgraded its Windows driver to the latest version 1.2.5.37 and the Intel PROSet software to 7.1.47 as found on this intel download page. Afterwards, I can choose WPA2-Personal as security mode and AES-CCMP as encryptionn algorithm in the PROSet software as shown in the screenshot below.

Saturday, April 25, 2009

Saving power with Linux

  1. Install cpufrequtils in Mandriva
    urpmi cpufrequtils

    lsmod | grep cpufreq_ondemand
    if nothing shows up, run
    modprobe cpufreq_ondemand

    echo ondemand > /sys/devices/system/cpu/cpu0/cpufreq/scaling_governor

    echo ondemand > /sys/devices/system/cpu/cpu1/cpufreq/scaling_governor
    echo 1 > /sys/devices/system/cpu/sched_mc_power_savings
    echo hpet > /sys/devices/system/clocksource/clocksource0/current_clocksource
    echo 5 > /proc/sys/vm/laptop_mode
    echo 1500 > /proc/sys/vm/dirty_writeback_centisecs
    echo min_power > /sys/class/scsi_host/host0/link_power_management_policy


    powertop


  2. cpufreq-info for Pentium-4 2.4C CPU after modprobe p4_clockmod:
    cpufrequtils 003: cpufreq-info (C) Dominik Brodowski 2004-2006
    Report errors and bugs to cpufreq@lists.linux.org.uk, please.
    analyzing CPU 0:
    driver: p4-clockmod
    CPUs which need to switch frequency at the same time: 0
    hardware limits: 300 MHz - 2.40 GHz
    available frequency steps: 300 MHz, 600 MHz, 900 MHz, 1.20 GHz, 1.50 GHz, 1.80 GHz, 2.10 GHz, 2.40 GHz
    available cpufreq governors: ondemand, conservative, powersave, userspace, performance
    current policy: frequency should be within 300 MHz and 2.40 GHz.
    The governor "performance" may decide which speed to use
    within this range.
    current CPU frequency is 2.40 GHz (asserted by call to hardware)
  3. cpufreq-info for Celeron E1400 CPU after modprobe acpi-cpufreq:
    cpufrequtils 005: cpufreq-info (C) Dominik Brodowski 2004-2006
    Report errors and bugs to cpufreq@vger.kernel.org, please.
    analyzing CPU 0:
    driver: acpi-cpufreq
    CPUs which need to switch frequency at the same time: 0
    hardware limits: 1.20 GHz - 2.00 GHz
    available frequency steps: 2.00 GHz, 1.60 GHz, 1.20 GHz
    available cpufreq governors: ondemand, conservative, powersave, userspace, performance
    current policy: frequency should be within 1.20 GHz and 2.00 GHz.
    The governor "ondemand" may decide which speed to use
    within this range.
    current CPU frequency is 1.20 GHz (asserted by call to hardware).
    cpufreq stats: 2.00 GHz:0.00%, 1.60 GHz:0.00%, 1.20 GHz:0.00% (1)
    analyzing CPU 1:
    driver: acpi-cpufreq
    CPUs which need to switch frequency at the same time: 1
    hardware limits: 1.20 GHz - 2.00 GHz
    available frequency steps: 2.00 GHz, 1.60 GHz, 1.20 GHz
    available cpufreq governors: ondemand, conservative, powersave, userspace, performance
    current policy: frequency should be within 1.20 GHz and 2.00 GHz.
    The governor "ondemand" may decide which speed to use
    within this range.
    current CPU frequency is 1.20 GHz (asserted by call to hardware).
    cpufreq stats: 2.00 GHz:0.00%, 1.60 GHz:0.00%, 1.20 GHz:0.00% (11)


    However, I noticed that with my 2.6.29.1-server-4mnb kernel, changing the governor among ondemand, powersave and performance doesn't change the total idle power consumption of my PC measured from the wall outlet. The figure (48W) never changes no matter whether the P-state of the E1400 is at 2GHz or 1.2 GHz. I guess it's probably because the CPU is put into C1E state during idle regardless of the P-state.

    I further noticed from this Japanese website (translated by Google), that the power consumption of the E1400 may be reduced by 4W if its core VID is dropped from 1.30V to 1.05V.

    I recompiled the acpi-cpufreq kernel module after applying the phc-intel patch (urpmi kernel-devel is needed for modpost) then inserted the module phc-intel. Afterwards, I tried to use the phctool to manually set the core VID for the E1400 but the core VID measured by sensors stays constant at 1.20V no matter what's shown in /sys/devices/system/cpu/cpu?/cpufreq/phc_controls.
References:
  1. LessWatts.org
  2. How to use CPU frequency scaling (cpufreq)
  3. Speedstep on Pentium III
  4. Documentation: The /proc/acpi/processor Subdirectory
  5. CPU C-States

Display Chinese file names correctly on Samba shares

I found I had to add the following to /etc/samba/smb.conf
unix charset = GBK
and restart samba. I also have the following locale rpm installed:
locales-zh-2.9-4mdv2009.1

Friday, April 24, 2009

sensors.conf for my TUL TG31-M2 (it8718 and coretemp)

The result of sensors -v gives sensors version 2.10.8 with libsensors version 2.10.8 and I have the following in /etc/sensors.conf

chip "it8718-*"
label in0 "VCore"
label in1 "VDDR"
label in2 "+3.3V" # VCC3
label in3 "+5V" # VCC
label in4 "+12V"
ignore in5
# label in5 "-12V"
label in6 "-5V"
label in7 "5VSB" # VCCH
label in8 "VBat"

set in0_min 0.85
set in0_max 1.5
set in1_max 2.0

compute in3 ((6.8/10)+1)*@ , @/((6.8/10)+1)
compute in4 ((30/10)+1)*@ , @/((30/10)+1)
# compute in5 ((30/10)+1)*@ , @/((30/10)+1)
compute in6 (1+120/56)*@ - 4.096*120/56 , (@ + 4.096*120/56)/(1+120/56)
compute in7 ((6.8/10)+1)*@ , @/((6.8/10)+1)

label temp1 "M/B Temp"
label temp2 "CPU Temp"
label temp3 "ACPI Temp"

label fan1 "CPU Fan"
label fan2 "SYS Fan"
label fan3 "PWR Fan"

ignore vid
# label vid "CPU Vid"
# compute vid @,@

# Coretemp max 86C (/sys/devices/platform/coretemp.0/temp1_max) instead of 100C
chip "coretemp-isa-*"
compute temp1 (@ -14),(@ +14)

Thursday, April 23, 2009

Disable IPv6 in Mandriva

I found I needed the following line in /etc/modprobe.conf to disable IPv6.
alias ipv6 off
I also had the following line in /etc/sysconfig/network
NETWORKING_IPV6=no
The IPv6 is then disabled after reboot.

Power Consumption of my PCs measured by Kill A Watt P4400


  1. Custom build: AMD Athlon 64 X2 5050e, ECS GF8100VM-M3 motherboard with Gigabit NIC, one hard drive, 80-PLUS CORSAIR CMPSU-400CX 400W PS

    • Hibernating: 2W

    • Starting up/Shutting down: 50W

    • Idle: 40W (50W before installing the AMD CPU driver)

  2. PowerEdge 400SC: P4 2.4C, 1GB DDR memory, Radeon 9600, one SATA hard drive

    • Hibernating: 1W

    • Starting up/Shutting down: 108W

    • Idle: 61W

    • Web surfing: 70-90W

    • Playing back a WMV: 78W(81W with high quality mode)

    • Standby (S3): 4W (7% of idle power)

    • Standby (S1): 52W (85% of idle power)

    It costs me about $36=52*24*365/1000*$0.08 for standbying S1 a year. How to avoid that.

  3. Custom build: Sempron 3100+, 1GB DDR memory, Geforce 6200, two hard drives, Ultra 500W PS

    • Starting up/Shutting down: 110W

    • Idle: 73W/60W after removing one hard drive and all the add-on cards except for the video card

    • Web surfing: 75-100W

    • Playing back video: 78W

    • Viewing HDTV (720P) with a PCI TV card: 90W

    • Standby (S3): 6W (8% of idle power)


  4. Custom build: Duron 1.6G, 512MB SDRAM, Radeon 7500, one hard drive, Ultra 400W PS

    • Hibernating: 5W

    • Starting up/Shutting down: 90-100W

    • Idle: 79W

    • Web surfing: 85W

    • Standby (S3): 5W (6% of idle power)


  5. Linux router: Celeron 1.2G (tualatin), 256MB SDRAM, No video card, one hard drive, two NICs, 80-PLUS PC Power & Cooling Silencer PPCS370X 370W PS(or Powmax 300W PS)

    • Hibernating: 2W

    • Starting up/Shutting down: 47W(55W)

    • Normal: 42-43W(52-54W)

  6. Linux router: Dual-Core Celeron E1400, 2GB DDR2-800, TUL TG31-M2 (Intel G31) motherboard with gigabit NIC, one fast ethernet NIC, Two hardrives (one WD GP), 80-PLUS 370W PS
    • Hibernating: 2W

    • Starting up/Shutting down: 60-70W

    • Idle: 46W (44W after gigabit ethernet speed disabled)

    • Normal during hard drive IO: 48W

  7. LCD Monitor: 17 inch 1280x1024

    • Power off: 1W

    • Normal: 29W

    • Standby: 4W


Wednesday, April 22, 2009

Upgrade kernel using urpmi in Mandriva

  1. Upgrade filesystem libraray and programs in case e2fsck needs to run after reboot
    urpmi libext2fs2 e2fsprogs
  2. Upgrade mkinitrd
    urpmi mkinitrd nash
  3. Upgrade kernel and initscripts
    urpmi kernel initscripts

Saturday, April 11, 2009

How to modify client scheduled scan in Symantec Antivirus

I found that to modify client scheduled scan in Symantec Antivirus Corporate Edition (the client is not controlled by any server), one needs to edit the registry.The key to edit is HKEY_LOCAL_MACHINE\SOFTWARE\Intel\LanDesk\VirusProtect6\CurrentVersion\LocalScans\clientscheduledscan_?\schedule(? is a number).

I simply deleted the key HKEY_LOCAL_MACHINE\SOFTWARE\Intel\LanDesk\VirusProtect6\CurrentVersion\LocalScans\clientscheduledscan_1 to disable the client scheduled scan. And the result is shown below:

Friday, April 3, 2009

Use LDAP EXOP to change userpassword in PHP

It seems to me I couldn't do LDAP EXOP directly in PHP 5. However, the CPAN module Net::LDAP::Extension::SetPassword can do it and I can use Perl Code from PHP. I installed the Net::LDAP in CPAN and php-perl by urpmi. Then the following PHP code is what I have to change LDAP UserPassword by EXOP (connection is by ldapi):


$perl = new Perl();

try {
$perl->eval('
use Net::LDAP;
use Net::LDAP::Extension::SetPassword;
$errtxt="";

sub changepass {
my $server=shift @_;
my $dn=shift @_;
my $oldpass=shift @_;
my $newpass=shift @_;

$ENV{LDAPI_SOCK}="/var/run/ldap/ldapi";
$ldap = Net::LDAP->new( $server, onerror => "warn" );
$ldap->bind($dn , password => $oldpass);
$mesg = $ldap->set_password( oldpasswd => $oldpass, newpasswd => $newpass);
$errtxt=$mesg->error();
return $mesg->code();
}
');

$server='ldapi://';
$dn='uid=user,ou=People,dc=example,dc=com';
$oldpass='oldsecret';
$newpass='newsecret';

$errno=$perl->changepass($server,$dn,$oldpass,$newpass);
$error=$perl->errtxt;

}

catch (PerlException $exception) {
echo "Perl error: " . $exception->getMessage() . " ";
}

if ($errno) {
echo "Error $errno: $error";
}

Monday, March 16, 2009

Change the slot number of Raid 1 device by mdadm

The command gives the following results after one drive is removed from Raid 1:
mdadm --detail /dev/md1
Number Major Minor RaidDevice State
0 0 0 0 removed
1 8 17 1 active sync /dev/sdb1

What I wanted to do is to move the device /dev/sdb1 to slot 0 from slot 1. And I found I could do that by running mdadm in grow mode with the degraded Raid 1 array:
mdadm --grow --force -n 1 /dev/md1
mdadm --detail /dev/md1
Number Major Minor RaidDevice State
0 8 22 0 active sync /dev/sdb1
mdadm --grow --force -n 2 /dev/md1
mdadm --detail /dev/md1
Number Major Minor RaidDevice State
0 8 17 0 active sync /dev/sdb1
1 0 0 1 removed


Then add a new device into md1
mdadm /dev/md1 -a /dev/sda1
mdadm: hot added /dev/sda1

Now I can install Lilo to the drive with -H option

Sunday, March 8, 2009

Short file name error while saving old doc file as docx in word 2007

Today when I tried to save a doc file I received in email as docx file in word 2007, I got a weird error message:
Cannot save the file. 'any file name.docx'
is not a valid short file name (maximum eight characters, plus a three-character file extension). Type a valid file name, and then save the file again.
Saving the file in doc format is still fine though.
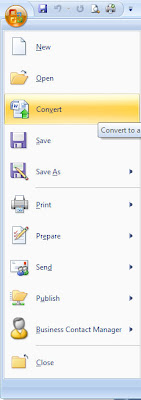
I did some investigation and ruled out the possibility that the complete file path is over the 255 character limit. Then I realized that this doc file was created in a MS Word version older than 97 so that it can't be saved as docx file before being converted to a compatible format. What I did to fix it is to click the Convert menu item (click the Office Button to show the menu when the file to be converted is open in word) as shown below(left) in word 2007 after I open the original doc file.
When the following dialog (right) pops up, I click the OK button and it's ready to be saved in docx format now without the annoying "short file name" error any more.

Saturday, February 28, 2009

Samba 3 as PDC

  1. Set up the Samba 3 server to authenticate against OpenLDAP as shown in a previous post
  2. Set the following in smb.conf (roaming profile disabled)
    domain logons = yes
    domain master = yes
    logon home =
    logon path =
  3. Create the following well-known groups under Ou=Group. This can be done in phpLDAPadmin by creating a child entry using the template Samba3 Group Mapping. It may also be done with the command net groupmap add. Their values for the attritubes cn, displayName and sambaSID are shown below (first three are essential domain groups):
    admin,Domain Admins, (sambaSID of sambaDomainName)-512
    guest,Domain Users, (sambaSID of sambaDomainName)-513
    host,Domain Guests, (sambaSID of sambaDomainName)-514
    user,Domain Computers, (sambaSID of sambaDomainName)-515
    The result can be checked by net groupmap list
  4. Add at least a user from Ou=people to the memberUid attribute of the group cn=admin,ou=Group. Its credential will be needed later when joining workstations to the domain.
  5. Create machine trust accounts under Ou=Hosts for the workstations before joining them to the domain. This can be done in phpLDAPadmin by creating a child entry using the template Samba 3 machine. Its Machine Name attribute must be in the format of machine_name$ and I choose to set its gid attritube to that of host group. The attribute sambaNTPassword will later automatically show up upon successful joining of the workstation to the domain.
  6. When prompted for username and password to join the domain, enter the uid and sambaNTPassword of the user who is a member of Domain Admins.
  7. Add the group Domain Users to the local Administrators group on a domain workstation (XP pro) to enable remote desktop access on it for the domain users. The group Domain Admins (RID 512) is already added upon joining of the domain.

Great Ref: The Official Samba 3.2.x HOWTO and Reference Guide
1. Chapter 27. Desktop Profile Management: contains instructions on how to
  • Disable roaming profiles
  • Convert Local Profile to Domain Profile
2. Chapter 12. Group Mapping: MS Windows and UNIX: contains important information about essential domain groups and their default RID.

Monday, February 16, 2009

Replcate openLDAP directory

I have the follwoing lines in /etc/openldap/slapd.conf after all the authz clauses to to replcate the LDAP directory from master once a day
syncrepl rid=123
provider=ldap://master:389/
type=refreshOnly
interval=01:00:00:00
searchbase="dc=examples,dc=com"
schemachecking=off
bindmethod=simple
binddn="uid=Replicator,ou=System Accounts,dc=examples,dc=com"
credentials=mysecret

Sunday, February 15, 2009

Setup replication of MySQL database

Creating a Data Snapshot Using mysqldump

Steps to set up the replication master server:
  1. Add an replication_user with REPLICATION SLAVE as the only enabled global privilege and accessible with password from the slave server.
  2. Edit the file /etc/my.cnf to include the following
    #skip-networking
    # binary logging is required for replication
    log-bin=mysql-bin
    expire_logs_days = 7
    server-id = 1
  3. Shut down both master and slave mysqld and copy raw data files from master to slave (excluding the master's binary log files)
  4. Start mysqld and obtain the position of binary log after making the master read-only by running following command in the mysql client: FLUSH TABLES WITH READ LOCK;
    SET GLOBAL read_only = ON;
    SHOW MASTER STATUS;
    +------------------+----------+--------------+------------------+
    | File | Position | Binlog_Do_DB | Binlog_Ignore_DB |
    +------------------+----------+--------------+------------------+
    | mysql-bin.000002 | 98 | | |
    +------------------+----------+--------------+------------------+

    Leave this mysql instance running during the rest of the replication setup

Steps to set up the slave server running on Windows:
  1. Edit the file e:\Program Files\MySQL\MySQL Server 5.1\my.ini to include the following
    #skip-networking
    bind-address=127.0.0.1
    server-id = 2
    relay-log=e:\Program Files\MySQL\MySQL Server 5.1\Data\mysqld-relay-bin
    relay-log-index=e:\Program Files\MySQL\MySQL Server 5.1\Data\mysqld-relay-bin.index
    #Check the size of the files ib_logfile? in your master data folder
    innodb_log_file_size = 5M
  2. Start mysqld and connect to the slave with a mysql client. Run the following commands:
    STOP SLAVE;
    CHANGE MASTER TO MASTER_HOST='master_host_name', MASTER_PORT=3306, MASTER_USER='replication_user', MASTER_PASSWORD='replication_user_password', MASTER_LOG_FILE='mysql-bin.000002',MASTER_LOG_POS=98;
    START SLAVE;
    SHOW SLAVE STATUS\G;
    The slave status can also be checked by examining the content of file master.info in the slave data folder without using a mysql client. Note the item Seconds_Behind_Master may give you some idea whether the master and slave are in sync.

Finally dont' forget to make the replication master server writable:
SET GLOBAL read_only = OFF;
UNLOCK TABLES;

Tuesday, February 10, 2009

System authentication using LDAP in Mandriva

The necessary packages are pam_ldap and nss_ldap. I enabled PAM authentication in /etc/ssh/sshd_config
UsePAM yes

Then updated the file /etc/pam.d/sshd to the following (/etc/ssh/denyusers is empty):
#%PAM-1.0
auth sufficient pam_ldap.so
auth required pam_listfile.so item=user sense=deny file=/etc/ssh/denyusers
auth include system-auth

account sufficient pam_ldap.so
account required pam_nologin.so
account include system-auth

password required pam_ldap.so
password include system-auth

session sufficient pam_ldap.so
session include system-auth


I also updated the file /etc/pam.d/proftpd to enable LDAP authentication for proftpd:
#%PAM-1.0

auth sufficient pam_ldap.so
auth required pam_listfile.so item=user sense=deny file=/etc/ftpusers onerr=succeed
auth include system-auth

account sufficient pam_ldap.so
account include system-auth

session sufficient pam_ldap.so
session include system-auth


The following are included in the file /etc/nsswitch.conf:
passwd: ldap files
shadow: files ldap
group: ldap files

Note: If a user with uid entry in both ldap and /etc/password, there should be two entries returned by the command getent passwd | grep username. Use command id username to return the corresponding user entry including the group membership.

The following items are changed in the file /etc/ldap.conf:
host
base
binddn
bindpw
scope sub
pam_filter objectClass=posixAccount
pam_login_attribute uid
ssl off
#default objectclass posixAccount and attribute uid
nss_base_passwd
nss_base_shadow
#default objectclass posixGroup and attribute cn
nss_base_group
nss_base_hosts


The above two files can also be modified by running the command drakauth

The nss_updatedb utility maintains a local cache of network directory user and group information. Used in conjunction with the pam_ccreds module, it provides a mechanism for disconnected use of network directories. I have the follwoing lines in file /etc/sysconfig/nss_updatedb
NSS_SERVICE=ldap
ONLY_LOGGED_USERS=yes

Ref: LDAP Authentication HOWTO

Sunday, January 4, 2009

Enable the CDR viewer of AsteriskNow GUI

CDR stands for Call Data Records. By default, Asterisk 1.4 generates CDR records in comma-separated text files in the /var/log/asterisk/cdr-csv directory. The file Master.csv contains all records. I have the following in the file /etc/asterisk/cdr.conf
[csv]
usegmtime=no ; log date/time in GMT. Default is "no"
loguniqueid=no ; log uniqueid. Default is "no"
loguserfield=no ; log user field. Default is "no"

In the file /var/lib/asterisk/static-http/config/cdr.html there's a statement to load the csv file for viewing the CDRs in web browser: ASTGUI.loadHTML("./Master.csv"). However, it fails since it couldn't find the file Master.csv in the folder /var/lib/asterisk/static-http/config. What I did is to create a symbolic link in this folder by the following command
ln -s /var/log/asterisk/cdr-csv/Master.csv
and the CDR viewer started working in AsteriskNow GUI (after Showing Advanced Options) .

Edit the file /etc/logrotate.d/asterisk to roate the CDRs monthly:
/var/log/asterisk/cdr-csv/*csv {
monthly
missingok
rotate 6
compress
delaycompress
}