Monday, March 30, 2015

Block Asterisk SIP registrations from internet/WAN hackers with iptables/shorewall

As a result of hundreds of hacking attempts targeted at my Asterisk server from internet, I've installed Fail2ban to automatically ban the IP addresses of the hackers from accessing after 3 failed attempts with the following in my jail.conf
[asterisk-udp]

enabled  = true
filter   = asterisk
action   = iptables-multiport[name=asterisk-udp, port="5060", protocol=udp]
           sendmail-whois[name=Asterisk-udp, dest=root, sender=root]
logpath  = /var/log/asterisk/messages
maxretry = 3

However, then I started to receive hundreds of email from Fail2ban telling me IP address were banned by it one after another. Below is an example email for banning an IP address in France:
Hi,
The IP 195.154.38.225 has just been banned by Fail2Ban after
63 attempts against Asterisk-udp.


Here is more information about 195.154.38.225:

[Querying whois.ripe.net]
[whois.ripe.net]
% This is the RIPE Database query service.
% The objects are in RPSL format.
%
% The RIPE Database is subject to Terms and Conditions.
% See http://www.ripe.net/db/support/db-terms-conditions.pdf

% Note: this output has been filtered.
%       To receive output for a database update, use the "-B" flag.

% Information related to '195.154.38.0 - 195.154.39.255'

% Abuse contact for '195.154.38.0 - 195.154.39.255' is 'abuse@proxad.net'

inetnum:        195.154.38.0 - 195.154.39.255
netname:        ISDNET-4
descr:          Tiscali France Backbone
country:        FR
admin-c:        BG34
tech-c:         TTFR1-RIPE
status:         ASSIGNED PA
mnt-by:         MNT-TISCALIFR
source:         RIPE # Filtered

role:           Tiscali Telecom France Registry
remarks:        now known as Online S.A.S. / Iliad-Entreprises
address:        8 rue de la ville l'évèque
address:        75008 Paris
address:        France
abuse-mailbox:  abuse@iliad-entreprises.fr
admin-c:        IENT-RIPE
tech-c:         IENT-RIPE
tech-c:         NR1053-RIPE
nic-hdl:        TTFR1-RIPE
mnt-by:         MNT-TISCALIFR
source:         RIPE # Filtered

person:         Benoit Grange
address:        Tiscali Telecom
address:        37 bis rue Greneta
address:        75002 Paris - France
phone:          +33 1 45 08 20 00
fax-no:         +33 1 45 08 20 01
remarks:        +-----------------------------------------------------------------------+
remarks:        | ATTENTION: Pour nous signaler un probleme (intrusion, spam, etc),     |
remarks:        | merci de respecter la procedure suivante:                             |
remarks:        | Envoyer un mail a "abuse@tiscali.fr" avec les informations suivantes: |
remarks:        | - date & heure (y compris le fuseau horaire ou l'heure GMT)           |
remarks:        | - adresse IP source ou toutes les en-tetes du mail                    |
remarks:        | - nature du probleme (en quelques mots)                               |
remarks:        | Nous ne repondons pas aux demandes par telephone.                     |
remarks:        | - - - - - - - - - - - - - - - - - - - - - - - - - - - - - - - - - - - |
remarks:        | Je ne suis que le representant legal de Tiscali et non pas            |
remarks:        | l'utilisateur final de l'adresse IP renvoyee par votre firewall       |
remarks:        | Les adresses IP sont generalement allouees dynamiquement a nos abonnes|
remarks:        | et donc votre logiciel ne peut PAS connaitre le nom de l'utilisateur  |
remarks:        | reel de l'IP. Merci d'avoir lu jusqu'au bout.                         |
remarks:        +-----------------------------------------------------------------------+
nic-hdl:        BG34
mnt-by:         MNT-TISCALIFR
source:         RIPE # Filtered

% Information related to '195.154.0.0/16AS12876'

route:          195.154.0.0/16
descr:          Online SAS
descr:          Paris, France
origin:         AS12876
mnt-by:         MNT-TISCALIFR
source:         RIPE # Filtered

% This query was served by the RIPE Database Query Service version 1.78 (DB-3)

Regards,

Fail2Ban

I've had enough such emails therefore I started looking for a way to block these hacking attempts from reaching my Asterisk server. I had shorewall installed on the Asterisk server as my firewall and NAT router. It has interface net defined on the internet/WAN side and the iptables chain net2fw is relevant for managing the traffic from internet to my firewall.
Therefore I added the following into /etc/shorewall/started to drop all SIP registration packets (containing string "REGISTER sip:") from internet destined to UDP port 5060 of my firewall
/usr/sbin/iptables -I net2fw -p udp -m udp --dport 5060 -m string --string "REGISTER sip:" --algo bm -j DROP
The --algo is a required parameter that specifies the pattern matching strategy (bm = Boyer-Moore, kmp = Knuth-Pratt-Morris). After restarting shorewall, the following is shown from iptables
# iptables -L net2fw
Chain net2fw (1 references)
target     prot opt source               destination      
DROP       udp  --  anywhere             anywhere             udp dpt:sip STRING match  "REGISTER sip:" ALGO name bm TO 65535
And I'm happy now that all these annoying hacking attempts are properly handled.

Tuesday, March 10, 2015

Sync multiple Google calendars on one google account to PC with Thunderbird Lightning

There are more than one way to sync Google calendar to a windows PC but a simple method is to sync via CalDAV by Thunderbird with Lightning extension . Lightning extension can be installed through the Add-ons menu in Thunderbird after it is installed. Restart Thunderbird to enable Lightning when prompted to do so.

 After the email account is set up, click on the account name on the folder pane on the left in the email tab to show the home page.

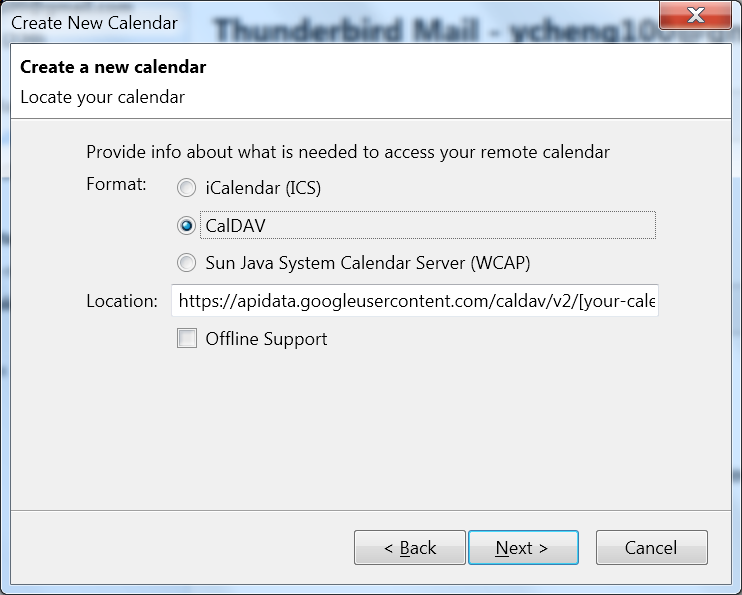
  • Click on the "Calendar" tab then right click on the empty space under the list of calendars on the left pane. The click on "New Calendar..."
  • Select a Network calendar


  • Select the CalDAV format and enter the following as location

https://apidata.googleusercontent.com/caldav/v2/[your-calendar-id]/events
Replace [your-calendar-id] with the Calendar ID found on the Calendar Settings -> Calendar Address section on your Google calendar. The Calendar ID of your first Google calendar is your Gmail address.


  • Enter the username and password of the Google account to authorize Lightning for managing your calendar. 
  • Repeat the above steps to create a calendar file for each of the rest calendars on one Google account. The calendar IDs of these calendars typically end with @group.calendar.google.com
  • And you can sit back and enjoy them now.


Tuesday, December 23, 2014

Fix slow USB mouse response on my Chromium OS


I have a cordless USB mouse Lenovo N50 connected to a MSI X340 laptop with Chromium OS installed on it. The same mouse works flawlessly on a Chromebook Acer C720 but it gets very slow response on the X340 with Chromium OS ArnoldTheBats build. The mouse cursor's movement on the screen always lags that of the actual mouse by noticeable amount of time. I've tried changing the mousing setting in Chromium browser or xset in console but neither worked. However, today I was able to fix it after updating the Chromium OS to the latest build by following the steps below:
  1. Set my own password for root user: Go to Developer Console in Chromium (push keys Ctrl- Alt-F2) and log in as user "chronos" with initial password "password". Then type the following command:
    sudo chromeos-setdevpasswd

    and enter the new password
  2. Become root user by typing the following command:
    sudo su

    and enter the password set in the previous step
  3. Check network status with the following command:
    ifconfig 
    In my case, the wireless interface wlan0 is not connected under developer console as no IP address is shown under wlan0. I had to connect an ethernet cable to the laptop to get interface eth0 up. 
  4. Update Chromium OS to the latest build with the following command: update_engine_client --update --omaha_url=http://chromebld.arnoldthebat.co.uk:8080/update
  5. (May not be necessary) After the above update is successful, type the following command:
    sudo stateful_update 
    In my case, this command actually failed.
  6. Try updating the system again as the previous command failed:
    update_engine_client --update
    sudo stateful_update 
    No need to supply the –omaha-url any more in future updates. It showed that the update succeeded and system needs reboot.
  7. Reboot the system and now the mouse is as responsive as on the other Chromebook
  8. Reinstall the Flash plugin: the update was 32-bit, so I used the first instruction below with the link http://goo.gl/FrT7Q6

Monday, December 22, 2014

Install Samba 4.1 AD DC on CentOS 7 with yum

CentOS 7's bundled Samba 4 does not provide Active Directory (AD) Domain Controller (DC) functionality due to the incompatibility between the Kerberos 5 libraries used by a Samba 4 AD DC (Heimdal) and those by RHEL/CentOS (MIT). However, Samba 4 binaries (rpms) compiled with Heimdal Kerberos library for CentOS 7 can be obtained from the Sernet Samba repository without the need of compiling Samba from its source code.

To download the rpm files with yum, a user account is necessary at the Sernet Samba repository. Signing up for a user account at Sernet is totally free and can be done in a minute. Upon successful registration, one can log into the portal and obtain a yum repo file with his username and password embedded in the repo URL. The repo file can be copied to /etc/yum.repos.d and one can then use yum to install the necessary rpms for a Samba 4 AD DC on CentOS 7.

If the bundled Samba 4 was installed in the system, remove it with yum first.
 yum remove samba*
The following Samba 4.1 rpms can then be installed from Sernet on CentOS 7 to enable a AD DC
sernet-samba-libs-4.1.14-9.el7.x86_64
sernet-build-key-1.1-4.noarch
sernet-samba-common-4.1.14-9.el7.x86_64
sernet-samba-libsmbclient0-4.1.14-9.el7.x86_64
sernet-samba-4.1.14-9.el7.x86_64
sernet-samba-winbind-4.1.14-9.el7.x86_64
sernet-samba-ad-4.1.14-9.el7.x86_64
sernet-samba-client-4.1.14-9.el7.x86_64


If there is existing Samba 3 NT4-style domain, it can be upgraded to AD type domain with samba-tool, which is installed as part of the packages above. The following Samba Classic Upgrade wiki guide provides excellent instructions on the upgrade. For simplicity,  one can use Samba 4's built-in DNS server for the AD DC. After the upgrade is complete, start the AD DC by
service sernet-samba-ad start
and test it following this guide.

Thursday, December 18, 2014

Value phones and inexpensive mobile family plan with 4G LTE data

A few smart phones that support 4G LTE data on Sprint's network were on sale with reasonable prices such as LG Optimus F3, LG TributeLG VoltHTC Desire 510 or Nokia Lumia 635. Their screen resolutions may not be full HD, but they have decent performance at their price range and in my opinion, they are great phones for Ting, Sprint's MVNO that has inexpensive mobile family plan.

On Ting, minutes, messages and data are pooled and shared between devices under the same account. You can have as many devices as you want on one account and each device costs $6 per month. There’s no premium charged for a mobile family plan and there isn't any weird line items on the monthly bills besides the taxes & regulatory fees. For example, to have 4 devices share 1000 minutes, 2000 global messages and 1 GB of 4G LTE data would have a total cost of $69/month plus taxes & regulatory fees at Ting, which is below $20/month per device. The 4G LTE data can be bumped to 2 GB for $10 more. At $79/month, it is still less than what I used to pay for only one device with 2 GB data at Verizon.

Most Sprint phones including these LG ones can be activated on Ting with the built-in hands-free activation after a Carrier Reset ##72786# (##SCRTN#). No flashing is necessary at all and you may also enjoy the 4G LTE data speed instantly with this phone that is not available from Page Plus or with a flashed device. If that doesn't sound good enough, Ting has started testing service on a GSM network since February 2015, which will allow both CDMA and GSM devices coexist under a single account and share a single pool of minutes, messages and megabytes.

What makes it even better is that Ting is giving out $25 credit for trying their service. The credit may be adequate for a month's free trial with Ting on one device. Click on this link to receive the promotion for $25 credit, which will show up upon successful activation.

Thursday, October 30, 2014

How to use Sprint LG Tribute with Page Plus (voice and SMS)

I bought a Sprint LG tribute this week at Bestbuy.  For $39.99, it comes with a solid specification:
  • 1.2 GHz Qualcomm Snapdragon 400 (MSM8926) quad-core
  • Android version 4.4.2
  • 4.5" diagonal LCD with 480 x 800 pixels
  • 4G LTE capability
Update: Page Plus phone activation policy is changing and will no longer allow activation of flashed devices after January 15th, 2015. However, this phone is great to use on Sprint's MVNO Ting for its inexpensive mobile family plan with 4G LTE data. No flashing is necessary at all for activating it on Ting and you may also enjoy the 4G LTE data speed instantly with this phone that is not available from Page Plus. As of now, Sprint's MVNO Ting is running a promotion with a $100 credit to new sign ups with a referral until 11:59pm EST on December 1, 2014. The credit is adequate for a few month's free trial with Ting ($12-21/month depending on usage). Click on this link to receive the promotion for $100 credit, which will show up upon successful activation.

I've had a few phones with Verizon or Page plus and like their signal coverage. Therefore I did the following to use it with Page plus:

  1. Obtain its MSL/SPC code: The MSL/SPC code of this phone may be obtained upon activation on Ting. Alternatively you can activate the phone on Ringplus with its $1.99 Kate plan after entering both its MEID and ICCID (activation would fail without ICCID) and obtained it's MSL/SPC code
  2. Enable DIAG mode (Serial/COM port): Dial ##3424# in the phone dialer then enter the MSL/SPC code obtained in the above step. Change the USB PC connection in Settings->Storage (after tapping on the menu icon ) from MTP to Charge Phone (important). If USB PC connection is MTP, the windows MTP driver instead of the serial port driver will be installed when the phone is connected to USB.
  3. Download and install the latest LG USB phone driver (LGUnitedMobileDriver_S51MAN312AP22_ML_WHQL_Ver_3.12.3.exe worked for me)
  4. Connect the phone to the PC via USB. In windows Device Manager, there is a new deivce installed as LGE AndroidNet USB Serial Port.
  5. Download and install the free software cdmaDevTerm 2.85. Extract the zip file with WinZip or 7-Zip to a folder on the hard drive and run the file cdmaDevTerm.exe.
  6. Connect to the phone by clicking on the button connect as red-boxed below. It should read out MDN/MIN and other information about the phone when connected.
  7. Change the SPC to my own (e.g. 000000).  First send the SPC code (manually enter in the box) to the phone by clicking the button send as red-boxed below. The phone should be unlocked now.
     
    Now enter my own SPC code (e.g. 000000) into the box after SPC and click on the button write as red-boxed below. The new SPC code can be read back by clicking on the button read to the left of button write
  8. Manually program the phone: (Update: It is not necessary to cancel plan at Ting or Ringplus prior to the activation of the phone at Page plus.) Activate the phone at Page plus (ESN swap for me as I had a Page Plus phone number on a old device). Obtain the MDN and MIN of the Page plus account and enter them into the two boxes (leaving the other fields unchanged). Then click the button write under the button disconnect as red-boxed below.
  9. Write a Verizon PRL to the phone: Download the PRL from internet and save to the hard drive (e.g. http://www.howardforums.com/showthread.php/1815401-Pageplus-latest-prl-hacked-for-sprint-radio-phones)
    1. Click on the select button to select the .prl file downloaded (53401_spt.prl for sprint phones worked for me)
    2. Click on the write button to write prl to the phone
  10. Reset the phone: Set the MODE of the phone to MODE_RADIO_RESET and click on the send button to reset the phone
  11. Make an outgoing call to test. Worked and also tested with receiving a SMS. The phone is working with Page plus now for voice and SMS. If for some reason, the outgoing call does not go through, repeat the step 8-11.
  12. 3G Data programming: A Verizon 3G capable phone (donor phone) that can be programmed to write new MEID/ESN and read out HA/AAA key may be necessary. The following  guides have detailed instructions on how to get PagePlus 3G data working on non-Verizon phones

Saturday, September 13, 2014

Convert a Korean speaking BlackVue DR550GW-2CH to speak English

Today I installed a BlackVue DR550GW-2CH camera on my car. However, I didn't know that its voice prompt was in Korean until I powered it on. Then I realized the DR550GW-2CH I installed came with a Korean firmware but I don't understand Korean at all. I tried upgrading its firmware to the official international firmware V2.002E but failed as the device keeps complaining "The verision information is different" (in English though) after powering on and refuses to work with this firmware on its MicroSD card.

The list below is a step-by-step guide of what I did to change its language to English (after upgrading its Korean firmware to V2.002K):
  1. Power off the DR550GW-2CH by unplugging its power cord. Wait until all the LEDs are off (and after some Korean voice prompt probably says it's powering off) and take out the microSD card. If its Korean firmware is already on V2.002K, Steps 2-4 can be skipped and jump to Step 5 directly. There is possibility that Steps 2-4 might not be necessary at all, but I did them prior to the conversion.
  2. Make a backup of all the files in the microSD card and then format the card to clean it up. I did the format with Windows explorer as shown in the screenshot below with drive letter K.
  3. Download the Korean firmware V2.002K for DR550GW-2CH from Blackvue's Korean website: Windows ZIP download link and extract the folder Blackvue and all the files within it to the root folder of microSD card (K drive in my case, and there will be a folder of K:\Blackvue after extraction). Inerst the micrSD card back to the device.
  4. Power on the device and it will say "Start upgrading" in Korean to upgrade the firmware to V2.002K. After upgrading, check to make sure the device works properly. Power off the device and take out the microSD card. 
  5. Prepare the conversion files on the microSD card as listed below
    • Download the file upload.rar from this link and extract the folder "upload" to the root folder of the microSD card (NOT under blackvue). In my case, there will be a folder of K:\upload after extraction.
    • Download the file upgrade.cgi from this link and extract the file "upgrade.cgi" to Blackvue\config. In my case, the file is in K:\Blackvue\config after extraction.
    • Inerst the micrSD card back to the device.
  6. Power on the device and push the Wi-Fi button to turn on Wi-Fi. Get on my PC with Wi-Fi connection and connect to the wireless network SSID starting with DR550GW-, the default password is blackvue
  7. Open a web browser on the same PC and copy&paste the following link then enter
    http://192.168.8.1/Config/upgrade.cgi to initial the conversion to English. Upon successful conversion, the following will be shown on the browser

    A critical function of the file upgrade.cgi is setting system_language to English in the firmware to enable upgrade to future versions of English firmware.
  8. Power cycle the device and enjoy its English voice guidance now. If English is all needed, skip Steps 9-11 and jump to Step 12.
  9. If any other language than English is needed, repeat Step 2 to clean it up. Download the English firmware V2.002E for DR550GW-2CH from Blackvue's English website: Windows ZIP download link and extract the folder Blackvue and all the files within it to the root folder of microSD card (K drive in my case, and there will be a folder of K:\Blackvue after extraction). 
  10. Run the program BlackVue\Application\Viewer for Windows\blackvue.exe in the microSD card and click on the setting icon on the right top corner. Select the desirable language and other settings (such as time zone) then save them to the microSD card.
  11. Inerst the micrSD card back to the device and power it on. It will prompt "upgrading firmware" then "restarting" after upgrade. After restarting, it will speak your language.
  12. Take a quick drive, its GPS should pick up the satellites and sync the time. 
  13. Congratulations and it's done.

Friday, May 9, 2014

Enable flash,PDF and mp3 plugin for 64-bit Chromium OS ArnoldTheBats build

Yesterday I downloaded and installed the latest 64-bit Chromium OS ArnoldTheBats daily buildCamd64OS-20140508010101.img.7zto an old laptop MSI X340. It booted into Chromium OS successfully and Wi-Fi worked well (push Fn-F8 to turn on Wi-Fi if the Wi-Fi LED is not lit). However, its web browser lacks the plugin of flash, mp3 player or PDF viewer that Chrome OS has. I had to do the following to get them to work:
  1. Login as a normal Chromium user (not a guest or a supervised one)
  2. Push Ctrl-Alt-F2 to open the developer console, where it shows "localhost login:"
  3. Enter "chronos" as the login user, "password" as the password if prompted
  4. Run the following command to become the root user
    sudo su
  5. Run the following command script as root user to enable the 64-bit flash and PDF plugin
    curl -L http://goo.gl/MuVta5 | bash
    After it downloads a file that is about 10 MB, it will install the 64-bit flash, mp3 player and PDF viewer plugins and restart the Chromium OS. The following functions were verified to be working after logging into Chromium:
  • Flash
  • PDF
  • mp3/mp4

Tuesday, January 28, 2014

Stop sleeping computers from waking up at nights by themselves

It's annoying to me recently some of my sleeping computers started waking up at nights randomly. The first thing I did is to identify devices that are currently configured to wake the computer up from a sleep state in Windows by the following command line:
Powercfg -devicequery wake_armed
Below is the list of the devices returned by the command:
Standard PS/2 Keyboard
Logitech USB TrackMan Wheel
Realtek PCIe GBE Family Controller

Since I had configured the computer to allow wake-on-LAN by magic packets for a while, it is anticipated to see the device "Realtek PCIe GBE Family Controller" on the list. However, I didn't expect to see the other two devices since I didn't want any unintentional motion or events on them to wake the computer up. So what I did to disarm them from waking up the computer is:
powercfg -devicedisablewake "Logitech USB TrackMan Wheel"
powercfg -devicedisablewake "Standard PS/2 Keyboard"
The above commands runs in Windows  7 or 8 with an elevated command prompt (running the Command Prompt program with administrator privileges). Now if I query for wake_armed devices again, I only see the network adapter, which is desirable.

Another useful command for troubleshooting the unintended waking up is
powercfg -lastwake to report information about the last event that woke the computer up from sleeping. And below is what's reported from one computer:
Wake History Count - 1
Wake History [0]
  Wake Source Count - 1
  Wake Source [0]
    Type: Wake Timer
    Owner: [SERVICE]     \Device\HarddiskVolume2\Windows\System32\svchost.exe (SystemEventsBroker)
    Reason: Windows will execute "NT TASK\Microsoft\Windows\Media Center\mcupdate_scheduled" scheduled task that requested waking the computer.


The above tells me that the task mcupdate_scheduled is so intelligent that it woke up the computer from sleep to do its job. And it is not alone. The following command can list all such clever tasks that can wake up the computer:
schtasks /query /FO list | more

The following command can disable the task from being scheduled again:
schtasks /change /TN "\Microsoft\Windows\Media Center\mcupdate_scheduled" /disable

After disabling all these tasks, the following command can confirm that no active timers are scheduled to wake up the computer.
powercfg -waketimers

The above changes worked for me to stop sleeping Windows 7 computers from waking up at nights by themselves.

Thursday, November 7, 2013

Where should I go after the End of XMPP with Google Voice on 5/14/2014?

As Obihai announced on its blog page, Google Sets the Date for the End of XMPP with Google Voice (GV) to be 5/14/2014. http://blog.obihai.com/2013/10/important-message-about-google-voice.html

After I read it, I decided to port my number out of GV to ANVEO (http://www.anveo.com/) since they are running a porting promotion at the moment (porting request must be submited before December 31st 2013). I can enjoy one year of unlimited incoming calls at ANVEO for $24. The terms for the free porting is copied below from their website:
 * Free Porting Specific Terms: When the FREE porting is complete the phone number will be pre-paid for 12 months and account will be charged a non-refundable $24 (12 x $2/month) for Personal Unlimited rate plan

Otherwise porting a US number needs $15 porting fee without the promotion. Another option to keep the old GV number working is to order a new phone number at ANVEO and forward the GV number to the ANVEO number. There is no setup fee for a new ANVEO phone number when it is ordered on 'Personal Unlimited' rate plan ($2/month). However, I'm not convinced that free GV forwarding will last long therefore I chose to port the GV number out.

I first went to the following web page to unlock my GV number. It was unlocked immediately after I paid $3 to Google for porting it out. https://www.google.com/voice/unlock
I need to submit a copy of the GV confirmation page for unlocking the number to ANVEO together with the porting request. The ANVEO porting request form can be downloaded from here. I submitted the porting request on night of 10/31 and added $30 into my ANVEO account with google checkout. I received an email from ANVEO on 11/5 saying that "the phone number porting is almost complete and it will be switched to our carrier within 48-72 hours. The phone number is now in your account." 

I tried to use the ANVEO number in Asterisk and it worked. Before I can used it on a SIP device, I needed to activate SIP service at ANVEO website under Account Options->SIP Device Registration. An SIP password is generated after the activation and Asterisk needs this SIP password to register for SIP. The username for a SIP device is the ANVEO account number. 

The following are the context for ANVEO in users.conf for Asterisk
[general]
hassip = yes
hasiax = no
registeriax = no
callwaiting = yes
threewaycalling = yes
callwaitingcallerid = yes
transfer = yes
canpark = yes
cancallforward = yes
callreturn = yes
call-limit = 100
qualify = yes
disallow = all
allow = ulaw,alaw
type = friend

[anveo]
host=sip.anveo.com
port=5010
username= {account number}
secret= {SIP password}
insecure=port,invite
group = null
hasexten = yes
canreinvite = yes
callcounter = yes
disallow=all
allow=ulaw
context=anveo-in
registersip = yes

And the following is the context in extensions.conf for ANVEO incoming calls(6666 is the extension number of my home)
[anveo-in]
exten => s,1,NoOp(From Anveo ${EXTEN})
exten => s,n,Dial(SIP/6666) 

I prefer Nonoh for outgoing calls, which currently offers free calling to countries such as US, Canada and China for 120 days after a credit (10 Euro minimum) is bought. And I found it a good idea to set the caller ID for outgoing calls to the ANVEO number at the Nonoh account settings.

The following are the context for Nonoh in users.conf for Asterisk
[nonoh]
host = sip.nonoh.net
username = {nonoh username}
secret = {nonoh password}
group = null
registersip = yes
canreinvite = yes
insecure = port,invite
hasexten = no

And the following is the context in extensions.conf for Nonoh (assuming the numbers dialed start with 00 then country code)
[DLPN_6666]
include = CallingRule_Out
include = default
include = parkedcalls
include = conferences
include = ringgroups
include = voicemenus
include = queues
include = voicemailgroups
include = directory
include = pagegroups
include = page_an_extension

[CallingRule_Out]
exten => _00[1-9]X.,1,Dial(SIP/nonoh/${EXTEN:0})

It is also possible to use ANVEO for outgoing calls, which costs 1 cent/minute in the US. The SIP device settings for outgoing calls can be found at
https://www.anveo.com/faq.asp?code=faq_sip_config

ANVEO also provides E911 service for $0.8/month per address and a bunch of add-ons for additional services.

Monday, July 22, 2013

Apache Hadoop with single Fedora node

Today when I tried to start Jobtracker for Apache Hadoop 1.2.1, I kept getting the following ENOENT error
FATAL org.apache.hadoop.mapred.JobTracker: ENOENT: No such file or directory
        at org.apache.hadoop.io.nativeio.NativeIO.chmod(Native Method)
        at org.apache.hadoop.fs.FileUtil.execSetPermission(FileUtil.java:699)
        at org.apache.hadoop.fs.FileUtil.setPermission(FileUtil.java:654)
        at org.apache.hadoop.fs.RawLocalFileSystem.setPermission(RawLocalFileSystem.java:509)
        at org.apache.hadoop.fs.RawLocalFileSystem.mkdirs(RawLocalFileSystem.java:344)
        at org.apache.hadoop.fs.FilterFileSystem.mkdirs(FilterFileSystem.java:189)
        at org.apache.hadoop.mapred.CompletedJobStatusStore.(CompletedJobStatusStore.java:81)
        at org.apache.hadoop.mapred.JobTracker.initialize(JobTracker.java:2051)
        at org.apache.hadoop.mapred.JobTracker.offerService(JobTracker.java:2328)
        at org.apache.hadoop.mapred.JobTracker.main(JobTracker.java:4792)

I realized the most important error is the bold one, which is related to logging as specified in mapred-site.xml
mapred.job.tracker.persist.jobstatus.dir
file:////var/log/hadoop/mr/jobstatus


After the the correct folder permissions are set, it should look like following
$ ll /var/log/hadoop/
drwxr-xr-x. 2 hdfs   hadoop 4096 Jul 22 22:45 hdfs
drwxr-xr-x. 4 mapred hadoop 4096 Jul 22 23:10 mapred
drwxr-xr-x. 2 mapred hadoop 4096 Jul 22 20:14 mr
After all the services are running, I can list them by
#jps
22896 DataNode
26189 TaskTracker
22225 NameNode
26502 Jps
26042 JobTracker
And I can list the listening ports of the services by
# lsof -i -P | egrep -v "ESTABLISHED" | grep java
java      22225   hdfs   66u  IPv4 573305      0t0  TCP localhost:8020 (LISTEN)
java      22225   hdfs   79u  IPv4 573311      0t0  TCP localhost:50070 (LISTEN)
java      22896   hdfs   63u  IPv4 575844      0t0  TCP *:50010 (LISTEN)
java      22896   hdfs   65u  IPv4 576654      0t0  TCP *:50075 (LISTEN)
java      22896   hdfs   73u  IPv4 575856      0t0  TCP *:50020 (LISTEN)
java      26042 mapred   64u  IPv4 589571      0t0  TCP localhost:9000 (LISTEN)
java      26042 mapred   75u  IPv4 589575      0t0  TCP localhost:50030 (LISTEN)
java      26189 mapred   61u  IPv4 590005      0t0  TCP localhost:40660 (LISTEN)
java      26189 mapred   79u  IPv4 590177      0t0  TCP *:50060 (LISTEN)


Monday, July 15, 2013

Fedora dracut in chroot environment

The following is the procedure to create new initframfs when the root filesystem has structural changes such as between LVM, MD or plain. 
  • Chroot to the desired folder (.e.g. /mnt/temp)
    chroot /mnt/temp
  • mount the system partitions /proc, /run, /dev, /sys
    mount -t proc proc /proc
    mount -t tmpfs tmpfs /run
    mount -t devtmpfs devtmpfs /dev
    mount -t sysfs sysfs /sys
  • mount the /boot and / partition
    mount -t ext4 /dev/sdb1 /boot
    mount -t ext4 /dev/md0 /
  • Create the udev/data folder to emulate the udev database
    cd /run
    mkdir udev/data
  • To include mdadm in Fedora dracut: add module mdraid found in /usr/lib/dracut/modules.d/
    dracut -v -f -a mdraid --mdadmconf /boot/initramfs-$(uname -r).img $(uname -r)

Saturday, July 13, 2013

How to make Samba 4 shares writable with Fedora 19 and Selinux

Today I found I couldn't create new folders in my samba 4 share under Fedora 19. And this was due to the settings of Selinux since there wasn't any problem without enabling Selinux.

The status of the Selinux boolean values that are relevant to Samba can be queried via the following command:

#getsebool -a | grep samba
#getsebool -a | grep smbd

Since we need to allow samba to modify shared files, the files/directories must be labeled public_content_rw_t and we must turn on the smbd_anon_write boolean.


  • Labeling all files under the share folder (e.g. /mnt/media) to public_content_rw_t so that they can be modified by multiple domains (Apache, FTP, rsync, Samba).

#semanage fcontext -a -t public_content_rw_t "/mnt/media(/.*)?"
#restorecon -F -R /mnt/media

Note: File context can be temporarily modified with the chcon command. However, that won't survive a relabeling. We need to permanently change the file context by using the semanage fcontext command. This will modify the SELinux labeling database. It is necessary to use restorecon to apply the labels.


  • Turn on the smbd_anon_write boolean:

#setsebool -P smbd_anon_write 1

  • It's NOT necessary to turn on samba_export_all_rw if the shared files/directories are properly labeled and the smbd_anon_write boolean is turned on.
  • The security context of the files can be verified via
    # ls -Z /mnt/media
    drwxrwxr-x. video media system_u:object_r:public_content_rw_t:s0 video


Tuesday, March 5, 2013

Running power calculator in windows 7

The following are important for the power calculator power toy to run successfully in windows 7:  
  • The file pcalc.exe needs to run in compatibility mode for windows XP. This can be set by right clicking the file pcalc.exe in windows explorer and click "Properties" of the context menu. Then click on the button near the bottom "Change settings for all userse" and check the compatility mode as shown below. Click OK to save the changes.


  • The file pcalc.exe can not reside in windows\system32 folder. I found windows folder or other folders should work.

Sunday, March 3, 2013

Use search in windows 7 to clean up the mess from BOX sync

Today I found that the BOX sync I installed for BOX.net caused a big problem in my data folder. It created multiple copies of the same file for each file in my local and remote data folder and some of the files were cloned for up to 20 times.

After I did a quick look at many of the cloned local copies created by BOX sync, I found there are some patterns on their file name and last modification date:

  • They have a file name appendix (n) before the file extension, where n is a number ranging from 1 to 20
  • They were last modified on the same day: Feb. 26, 2013
  • They are all files. No sub folders were cloned
I could use search in windows 7 to locate all the files satisfying the above patterns with the following search syntax:
filename: "(" kind: NOT folders datemodified:‎2/‎26/‎2013
More than 3000 items were found matching the search criteria. After I verified that they were actually excessive files, I selected all of them and deleted them to clean up the mess. 

Saturday, October 20, 2012

Increase/grow the capacity/space of a linux Raid 1 partition without losing data

Today I found I needed to increase the capacity of my data partition (on a Raid 1 array) to fit a hard drive upgrade. Below are a couple of good references on how that can be done and some arguments to mdadm need to be adjusted to work for me
http://www.flyonthenet.it/blog/?p=71
http://johnlange.wordpress.com/tech-tips/linux/expanding-linux-software-raid1-with-an-ext3-file-system/
The safe and lengthy procedure is as follows (assuming the old array consists of drive A and B and the new array with increased capacity consists of drive C and D):
  1. Back up all the data on the Raid 1 array (e.g. /dev/md2) and umount the array from the system
  2. Remove the partition on one old drive (A) from the Raid 1 array that needs to grow capacity
  3. Partition a new hard drive (C) as Linux raid autodetect/fd type with the wanted capacity and add that partition to the Raid 1 array. Mdadm will start recovery/resync of the array.
  4. Let mdadm finish resyncing the array and the array is now clean again (very important, otherwise data loss). Make sure the array status has [UU]
    cat /proc/mdstat
    md0 : active raid1 sdb1[1] sda1[0]
    76798592 blocks [2/2] [UU]
  5. Remove the partition on the remaining old drive (B) from the array.
  6. Partition the second new hard drive (D) as Linux raid autodetect/fd type with the wanted capacity and add that partition to the Raid 1 array. Mdadm will start recovery/resync of the array.
  7. After resyncing is complete, the underlying block device of the array is now of an appropriate size to hold the file system with increased capacity. Grow the capacity of the array and let the resyncing finishmdadm --grow /dev/md2 --size=max
  8. Resize the ext file system
    e2fsck -f /dev/md2
    resize2fs /dev/md2
    e2fsck -f /dev/md2
  9. Mount the array


    Alternatively, a quick and dirty solution to grow the capacity of the array (metadata version 0.90) on the same pair of drives (A&B) is shown below
  • Back up all the data on the Raid 1 array (e.g. /dev/md2) and umount the array from the system
  • Increase the size of the partitions of the raid devices on the existing hard drives (A&B)
  • Create new raid array with mdadm (note the metadata argument to specify the same metadata as in the previous array is critical. Otherwise e2fsck will not find the superblock since latest mdadm uses metadata version 1.2 as default)
    mdadm --create /dev/md2 --level=raid1 --raid-devices=2 /dev/sdc1 /dev/sdb1 --metadata 0.90
    If mdadm prompts that the partitions already contain an ext2fs file system, hit "y" to continue.
    Continue creating array? y
    mdadm: array /dev/md2 started.
  • Check the file system on the array and fix the errors. Then resize the file system.
    e2fsck -f /dev/md2
    resize2fs /dev/md2
    e2fsck -f /dev/md2
  • Mount the array

Saturday, August 4, 2012

Disk benchmarks


  1. Ramdisk (FAT32) created by DATARAM RAMDisk v3.5.130R24 (freeware) under windows 7 64-bit
  2. SSD Crucial M4-CT064M4SSD2 Firmware 0309 with SATA II 3Gb/s connection
  3. SSD

Tuesday, June 19, 2012

Use ImageMagick to create GIF file

convert -resize 50% -delay 50 -loop 0 IMG*.JPG animation.gif
convert animation.gif -crop 1152x768+0+150 crop.gif
Reduce image size: convert animation.gif -resize 100x50 small.gif

Sunday, June 3, 2012

Use FFMPEG to process video files


  • Rotate video files
  1. Download latest FFMPEG windows build from here
  2. Move all video files to be rotated (e.g. MOV files) into a subfolder. 
  3. Execute the command below from within a CMD script file (it must be executed from within a CMD script file since it will fail if copy and paste on the command line)
    FOR /F "tokens=*" %%G IN ('dir /b *.MOV') DO ffmpeg -i %%G -vf "transpose=1" -qscale 0 -s 608x1080 -y %%G.rotated.MOV
    All videos will rotate 90 degree clockwise (transpose=1). Change it to transpose=2 for counterclockwise. Height of the videos is reduced to 1080 since some media players have problem playing back files whose height is larger than 1080. Output files will append .rotated.MOV to the name of input files.
    • Set the dimension and frame rate of output file
      Command option -r set frame rate in frames/second, -s set dimension to be widthxheight
      ffmpeg -i input.mp4 -qscale 0 -r 30 -s 720x1080 -y output.mp4
    • Slow down a video
      • Copy the video to a raw bitstream format
        ffmpeg -i input.mp4 -map 0:v -c:v copy -bsf:v h264_mp4toannexb raw.h264
      • Generate new timestamps while muxing to a container
        ffmpeg -fflags +genpts -r 19.25 -i raw.h264 -c:v copy output.mp4
    • Trim video file
    1. Extract the video stream and discard the audio stream: -c copy -an option
      ffmpeg  -i input.mp4 -c copy -an noaudio.mp4
    2. Trim time: Today I have a need to trim the first 8 seconds off a mp4 video file taken by my cell phone. I found I could use -ss option to specify the start time and -t option to specify the duration of the trimmed video (below 12 seconds) and re-encode the video: 
      • ffmpeg -i input.mp4 -ss 00:00:08 -t 00:00:12 output.mp4
      • If the encoding is slow, -c copy option can skip the encoding but could generate an output file than can not seek properly
    3. Trim size: can be done with the crop filter
      • ffmpeg -i input.mp4 -filter:v "crop=out_w:out_h:x:y" output.mp4
        the arguments are as follows:
        • out_w is the width of the output rectangle
        • out_h is the height of the output rectangle
        • x and y specify the top left corner of the output rectangle relative to the top left corner of the input video
    • Convert video to GIF file
      • Generate individual frames from the video file
        mkdir frames
        ffmpeg -i out.mp4 -r 10 frames/ffout%03d.png
      • Remove unwanted frames
      • Convert frames to GIF file using ImageMagick
        convert -delay 0.25 -loop 0 frames/ffout*.png output.gif
    • Concatenate multiple video files into one
      Utilize the concat filter to concatenate multiple video files into one
      ffmpeg -f concat -i inputs.txt -c copy -y output.mp4
      The file inputs.txt should list all the video files to be concatenated (one file per line) and its contents look like the following:
      file 1.mp4
      file 2.mp4
      file 3.mp4
      file 4.mp4
    • Mix video and audio files
      I found a quick way to mix an audio mp3 file and a video/audio mp4 file by using the -map argument with ffmpeg:
      ffmpeg -i input0.mp4 -i input1.mp3 -map 0:v:0 -map 1:a:0 -c copy -shortest out output.mp4
      -map 0:v:0 for (0) input file zero, (v) video streams of the input file, (0) stream zero (first) of the video streams
      -map 1:a:0 for (0) input file one, (a) audio streams of the input file,  (0) stream zero (first) of the audio streams
      -c copy copy the desired streams to the output file instead of encoding them to maintain the same quality
      -shortest designate the duration of the output file to be the same as the shortest one among input streams

    Monday, March 26, 2012

    Using multiple Google Voice (GV) numbers in one android phone

    I found it practical to use at least two GV numbers in one android phone with reasonable usability. I had purchased the Groove IP app for my primary GV number since it was proven to be the best solution for using GV with android phones. Then I installed SIPdroid and created an PBxes.org account for using a second GV account with PBxes.org. I then switched to csipsimple for this GV number since it can be integrated into the native dialer. In theory, I could run SIPdroid to register a third GV account then I can have three GV numbers to work in one cell phone but I haven't tested that yet.

    I did found one issue initially: csipsimple no outgoing calls
    I updated csipsimple to the latest version but that didn't help: it can receive incoming calls without any problems but can not make outgoing calls with its dialer. It typically drops calls in one second after the outgoing calls are dialed. I thought Groove IP and csipsimple could share the native dialer but apparently that is not the case. I needed to uncheck integration csipimple with android in its settings to make outgoing calls working again. Otherwise it would try to use the native dialer for outgoing calls and that was default to use Groove IP in my native dialer and that's why it failed.